101Leafy researched the games.
Vanilla Secret 1
A level in Vanilla Dome: map spot $2D, level data $109. It has two exits, and the secret one opens a path of its own on the map. The timer starts at 300.
From the books
バニラドームひみつのコース1 「バネを使って上へと進んでいく。ゴールすればバニラ台地に出る。」
"Climb upward using springboards. Reach the goal and you come out on the Vanilla plateau." (our translation)
スーパーマリオブラザーズ百科 任天堂公式ガイドブック (Shogakukan, 2015) p58
From the magazines
バニラドーム ひみつのコース1 「赤スイッチを押した後にバニラドームのコース1に行くと、点線ブロックが実体化していて上に登れる(赤スイッチを押していなくても行く方法がないではないが)。ここからバターブリッジまでは普通にゴールすればどんどん先に進むことができるよ。」
"Go to Vanilla Dome 1 after pressing the red switch, and the dotted-line blocks are solid, so you can climb up (there is a way even without the red switch). From here to Butter Bridge you keep moving on just by reaching the normal goals." (our translation)
スーパーマリオワールド 完全攻略本 Vol.2 (ファミリーコンピュータMagazine 1991 No.2 supplement, Tokuma Shoten, 1991) p5
ひたすら上に登ろう 「縦に長いコース。バネとジャンプ台をうまく使って上に登ろう。」
"A tall course. Use the springboards and jumping boards to climb." (our translation)
スーパーマリオワールド 完全攻略本 Vol.2 (ファミリーコンピュータMagazine 1991 No.2 supplement, Tokuma Shoten, 1991) p6
豆の木を出そう 「この部分は、いかにマントマリオといえども飛んでいくことはできない。ノコノコとパタパタにブツからないように注意しながら、ブロックをたたいて豆の木を出そう。」
"Even Cape Mario cannot fly up this part. Hit the block to grow a beanstalk, and watch out for the Koopa Troopas and Koopa Paratroopas." (our translation)
スーパーマリオワールド 完全攻略本 Vol.2 (ファミリーコンピュータMagazine 1991 No.2 supplement, Tokuma Shoten, 1991) p6
妙に広いのが気になる 「敵キャラはそんなに登場しないが、とにかく広い。なかば迷路状になっているから、迷ってタイムオーバーになる危険もあるぞ。そういえば、このコースも赤い丸だったハズ。どこかに、別のゴールがあるに違いない。」
"Not many enemies, but it is huge, and half a maze, so you can get lost and run out of time. This course was a red dot on the map too, so there must be another goal somewhere." (our translation)
スーパーマリオワールド 完全攻略本 Vol.2 (ファミリーコンピュータMagazine 1991 No.2 supplement, Tokuma Shoten, 1991) p6
コインを忘れずに 「普通のジャンプでは到底、届かないところにドラゴンコインがある。少し下にジャンプ台が置いてあるので、それを持ってくれば2枚とも取ることができる。」
"There are Dragon Coins far out of reach of a normal jump. A jumping board sits a little below. Bring it over and you can take both." (our translation)
スーパーマリオワールド 完全攻略本 Vol.2 (ファミリーコンピュータMagazine 1991 No.2 supplement, Tokuma Shoten, 1991) p7
見落としちゃダメ 「左側のポケットのようになった部分にもドラゴンコインがある。時間に余裕があれば、これもいただいてしまおう。このポケットの出口のあたりに青い点線ブロックが2つ並んでいるけれど、一体、なんのためなんだろうね。」
"There is also a Dragon Coin in the pocket on the left. Take it if you have time. Two blue dotted line blocks sit side by side near the pocket's exit. What could they be for?" (our translation)
スーパーマリオワールド 完全攻略本 Vol.2 (ファミリーコンピュータMagazine 1991 No.2 supplement, Tokuma Shoten, 1991) p7
ゴールがもう1つあるぞ 「左側の土管に入るともう1つのゴールへ行ける。スターロードへの道だ。」
"There is one more goal. Go into the pipe on the left side and you reach the other goal. It is the way to the Star Road." (our translation)
スーパーマリオワールド 完全攻略本 Vol.4 (ファミリーコンピュータMagazine 1991 No.6 supplement, Tokuma Shoten, 1991) p5
もう1つのゴールだ 「土管の先にはもう1つのゴールがある。ゴールすると、スターロードが出現するのだ。ここからネイティブスターへと行けるぞ。」
"There is one more goal past the pipe. Reach it and a Star Road appears. From here you can go to Star World." (our translation)
スーパーマリオワールド 完全攻略本 Vol.4 (ファミリーコンピュータMagazine 1991 No.6 supplement, Tokuma Shoten, 1991) p5
ジャンプ台をここへ 「青のスイッチを押していればここにブロックが出現する。そこにジャンプ台を置いて使えば、土管へ入ることができるぞ。」
"If you have pressed the blue switch, blocks appear here. Put a Jumping Board on them and use it, and you can get into the pipe." (our translation)
スーパーマリオワールド 完全攻略本 Vol.4 (ファミリーコンピュータMagazine 1991 No.6 supplement, Tokuma Shoten, 1991) p5
慎重にパワーアップ 「2つある?ブロックのうち、右側がパワーアップだ。このあたりにはパタパタがうろついているので、注意しながら取るようにしよう。」
"Of the two ? Blocks, the right one has the power-up. Winged Koopa Troopas hang around here, so take it carefully." (our translation)
スーパーマリオワールド 完全攻略本 Vol.4 (ファミリーコンピュータMagazine 1991 No.6 supplement, Tokuma Shoten, 1991) p5
ブルは無視してゴール 「上の段にはブルがいる。戦わなくても下の段を通ってしまえばいい。」
"There is a Chargin' Chuck on the upper step. You do not have to fight him; just go along the lower step." (our translation)
スーパーマリオワールド 完全攻略本 Vol.4 (ファミリーコンピュータMagazine 1991 No.6 supplement, Tokuma Shoten, 1991) p5
- Name in the game
- VANILLA SECRET 1
- World
- Vanilla Dome
- Map spot (translevel)
- $2D
- Level number
- $109
- Timer
- 300
- Normal exit
- map event $1D
- Secret exit
- map event $1E
Map
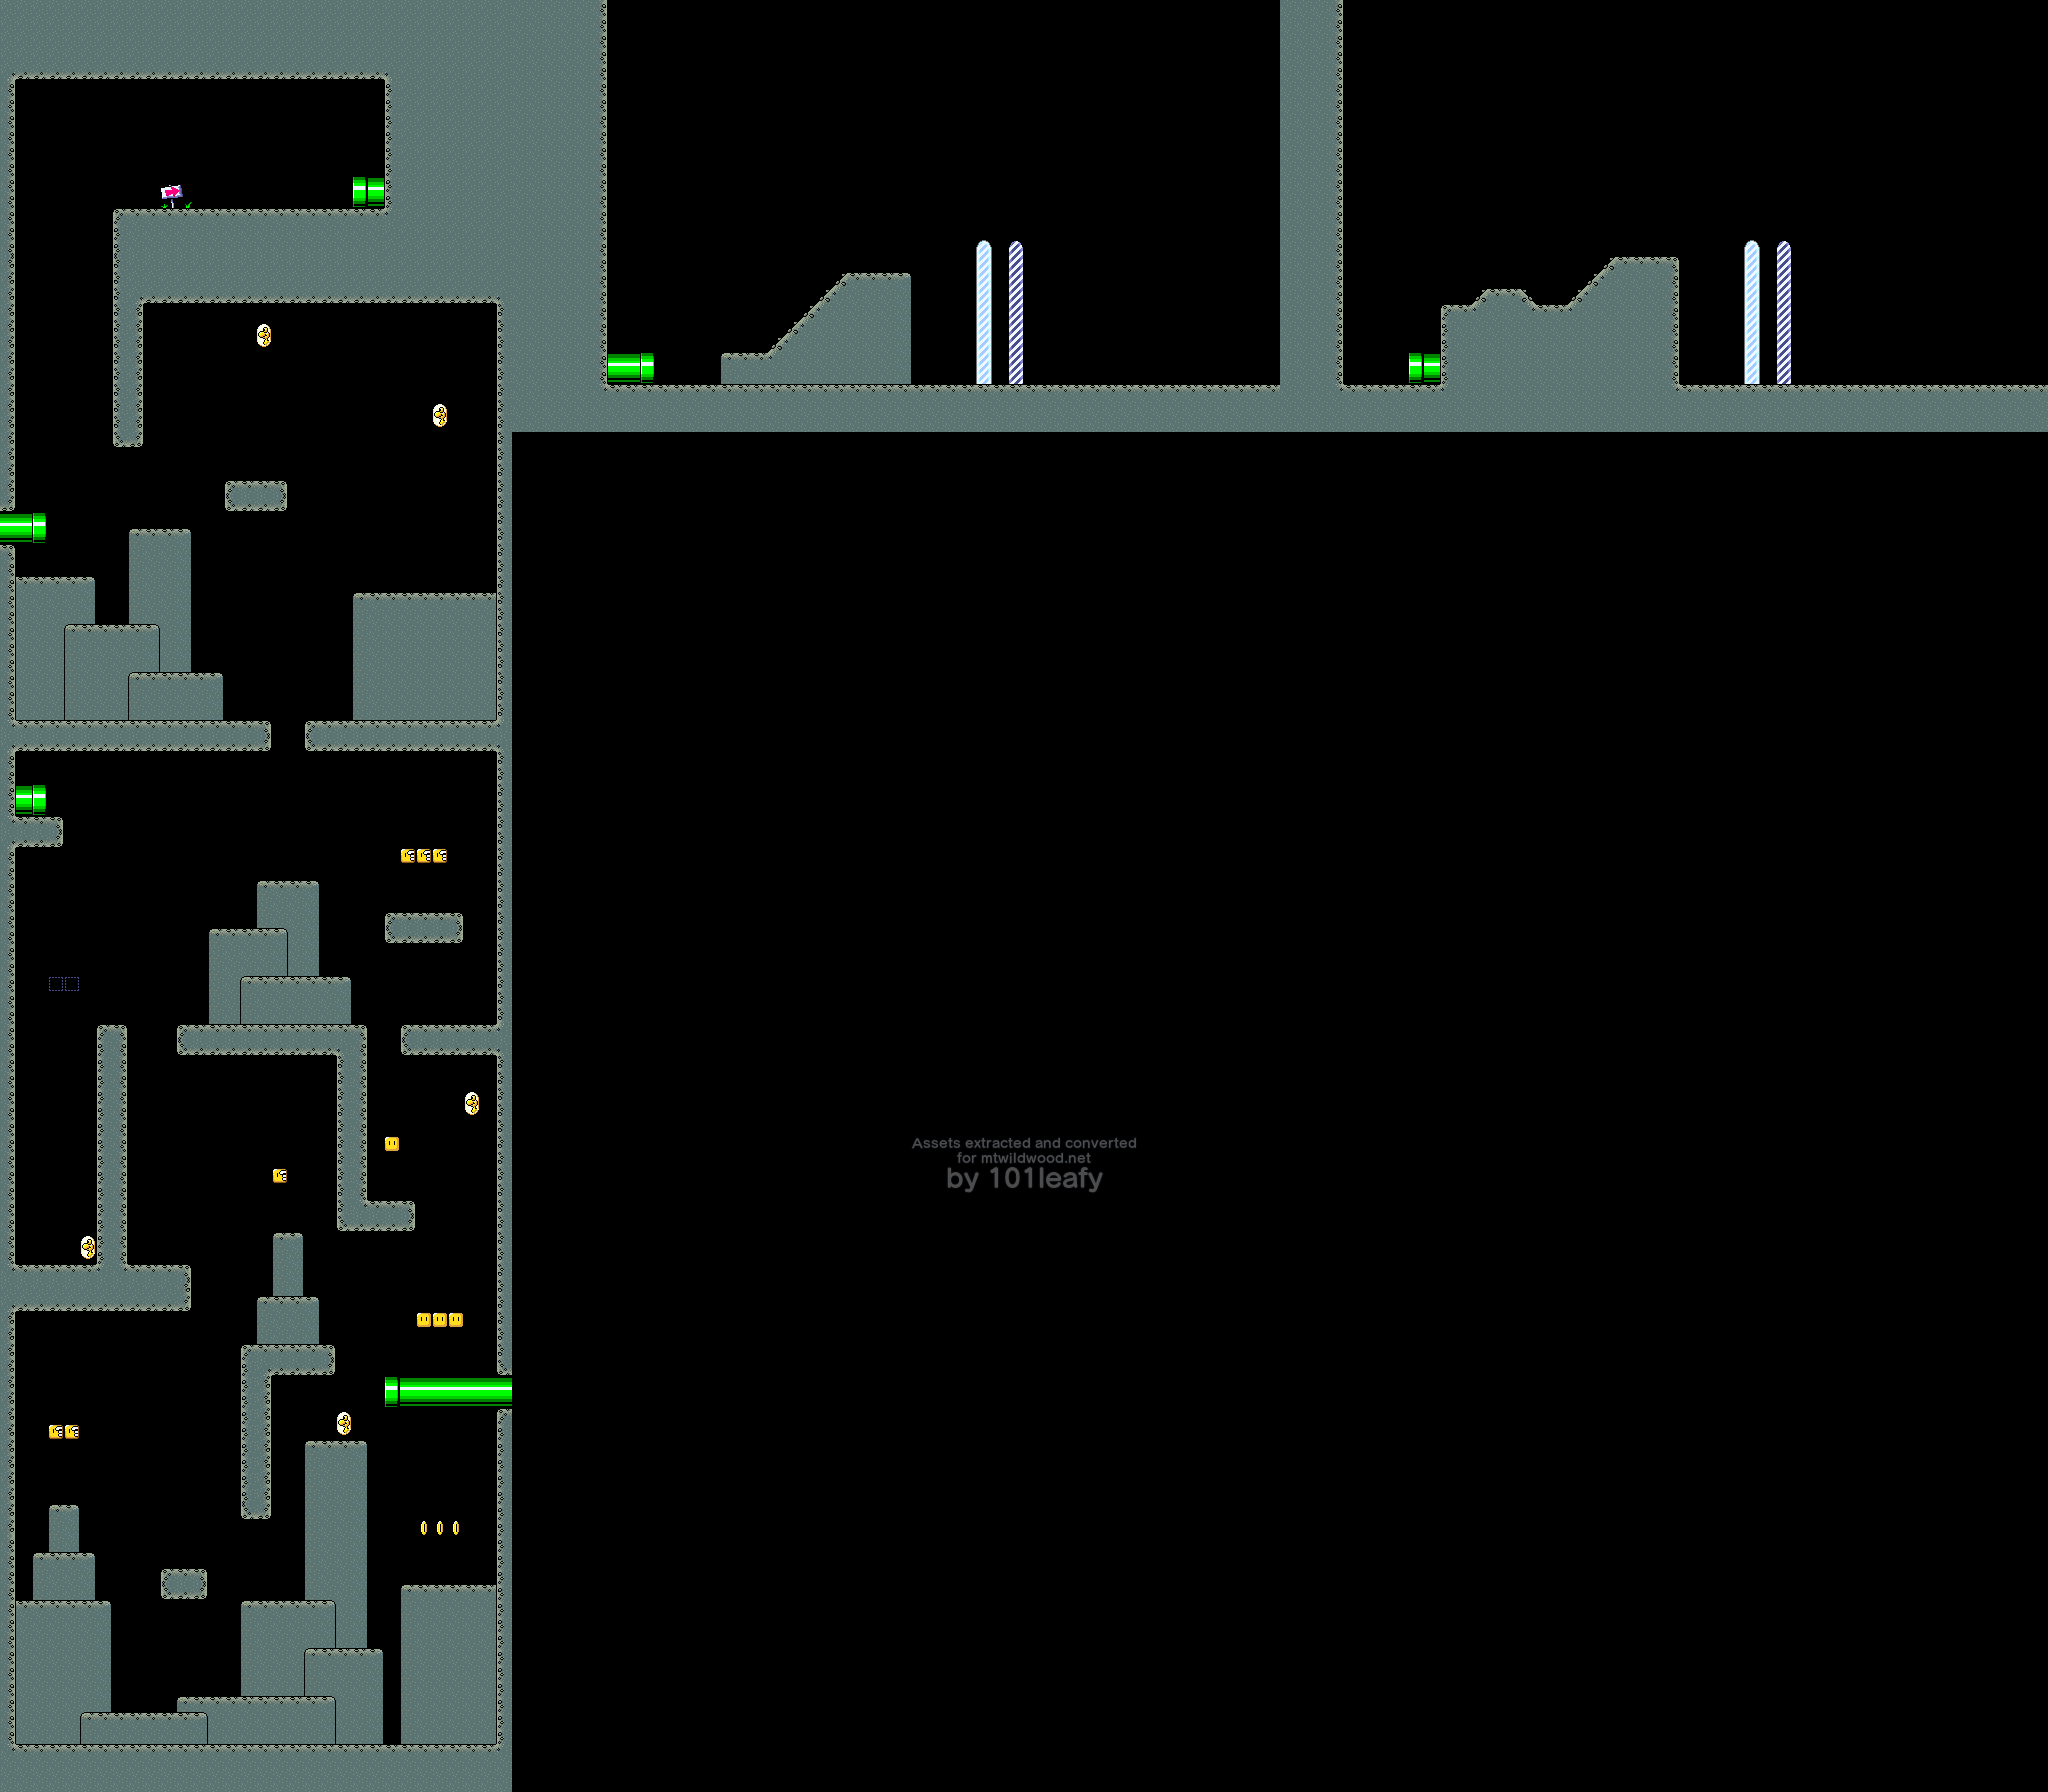
Each area was loaded with the game's own code and drawn at 1x from the blocks it left in memory. The areas reached through screen exits sit side by side, left to right. Red boxes mark enemies and items. Green boxes mark the other objects: platforms, the goal tape, switches, and the like. Dashed boxes mark the sprites not matched to a name. Blue boxes mark the pipe or door of each screen exit. An exit on a screen with no pipe or door is marked at the start of that screen. A box links to the enemy or item page, to its row on the objects page, or to where the exit leads.
Sprites
From the sprite data of each area (ROM $07:CDC8 for the first). Each id was spawned with the game's own loader and matched by eye to the enemy lists in the manuals, Mario Mania (pp50-52), and the Shogakukan guide. Ids that are not matched stay as numbers. Ids with no enemy or item page link to their row on the objects page.
| Name | Sprite id | Count | Area |
|---|---|---|---|
| Springboard on a wall | $6C | 4 | $109 |
| Springboard on a wall | $6B | 5 | $109 |
| Jumping Board | $2F | 2 | $109 |
| Winged Koopa Troopa | $0B | 8 | $109 |
| Koopa Troopa | $05 | 2 | $109 |
| Winged Koopa Troopa | $09 | 1 | $109 |
| Chargin' Chuck | $97 | 2 | $1F1, $1F0 |
| Goal tape | $7B | 2 | $1F1, $1F0 |
Screen exits
Where each screen's exit leads. Every pipe and door on one screen goes to the same exit.
- ROM names $04:A156, event $05:D635, sprites $07:CDC8
Vanilla Secret 2 · Vanilla Secret 3 · Vanilla Fortress · Vanilla Ghost House · Vanilla Dome 3 · Vanilla Dome 2 · Vanilla Dome 4 · Vanilla Dome 1 · Red Switch Palace · #3 Lemmy's Castle