101Leafy researched the games.
The Lost Levels World 1-2
スーパーマリオブラザーズ2 ワールド1-2
- Timer
- 400
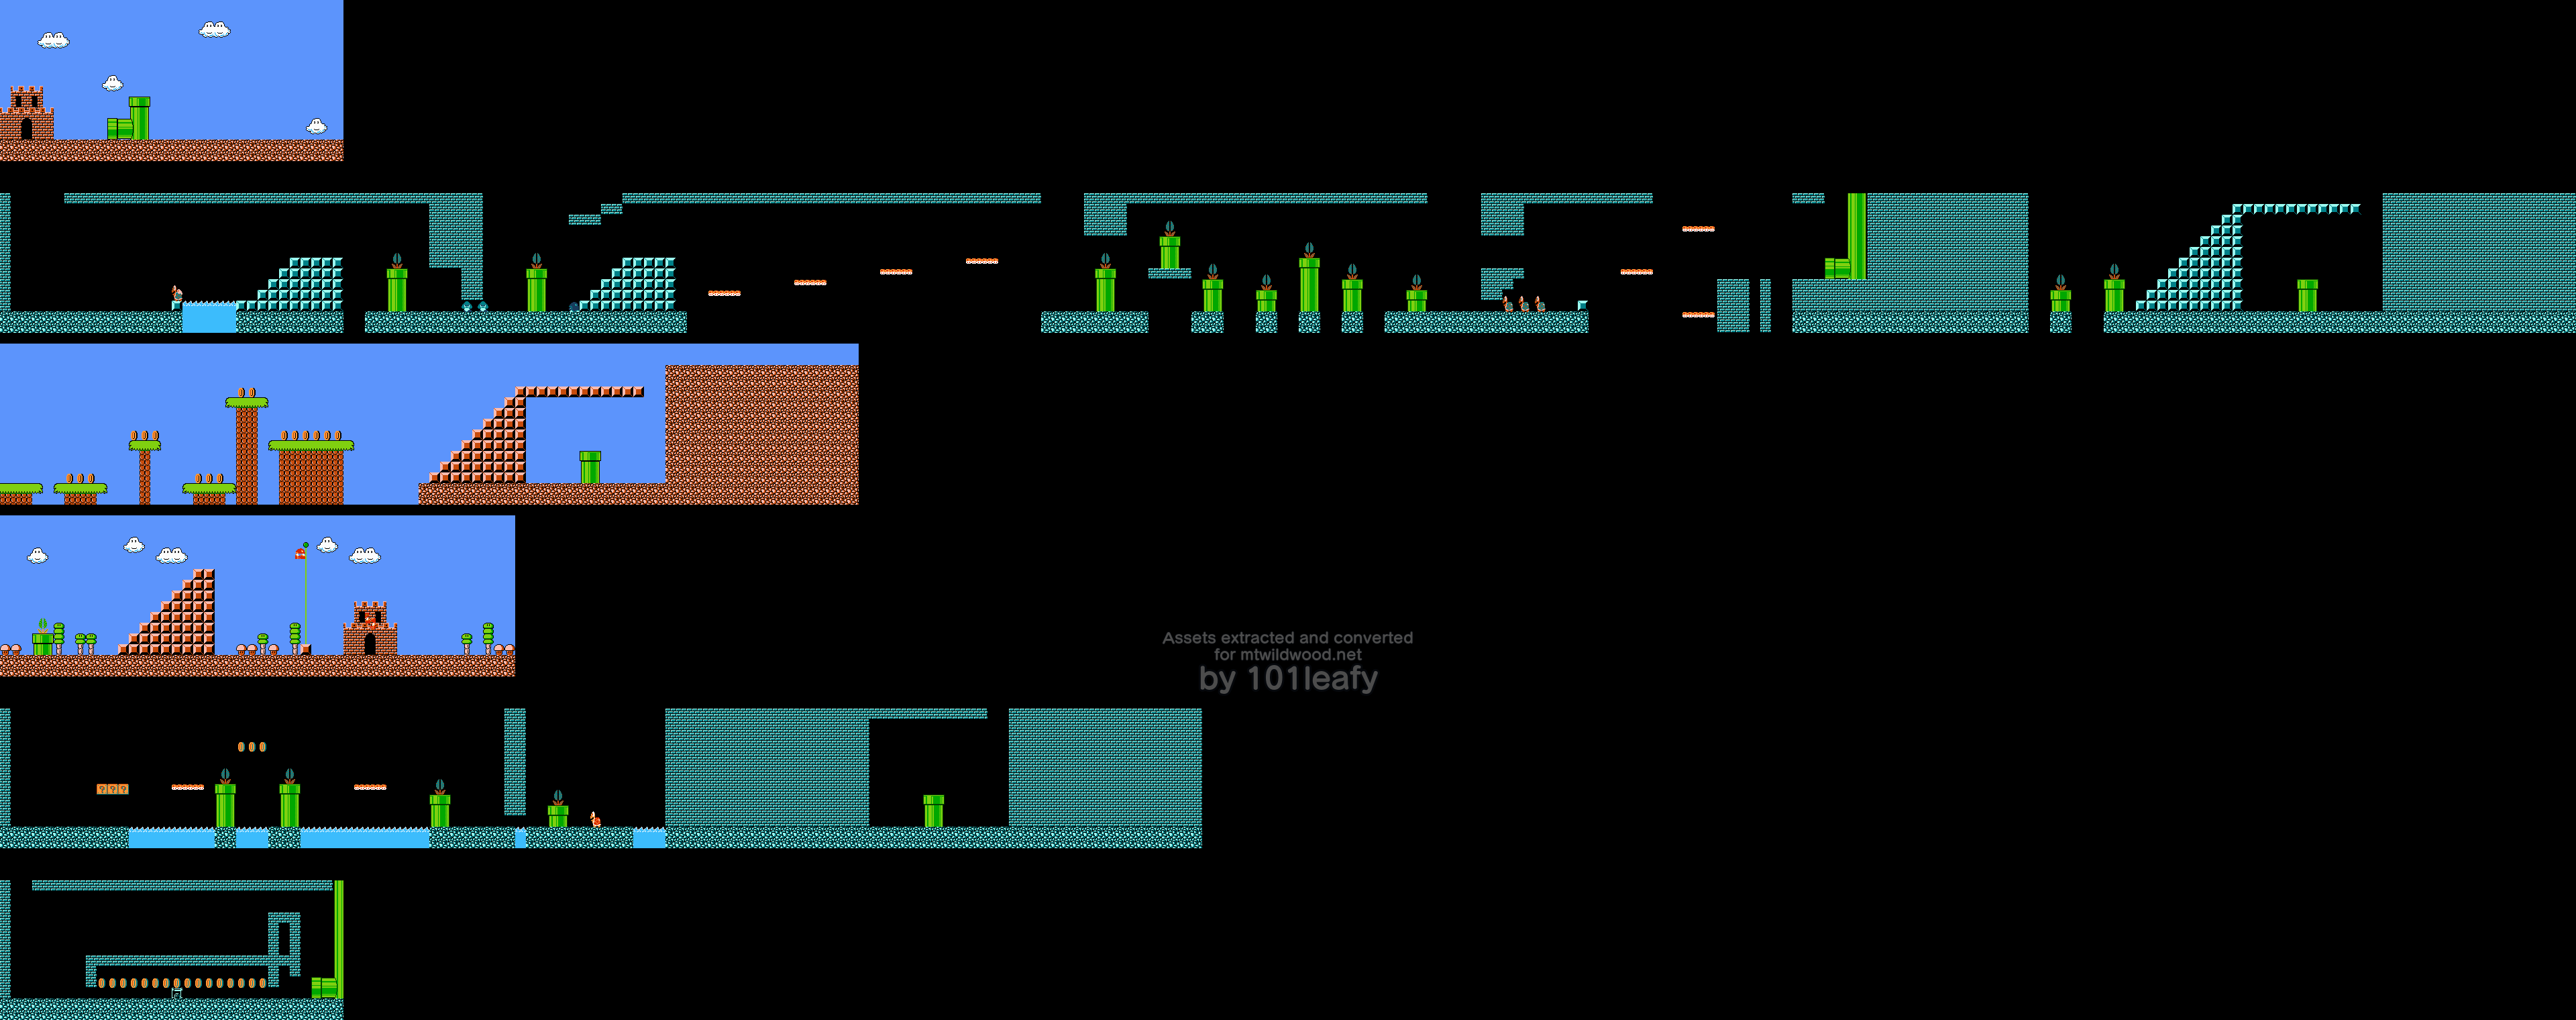
- Map
- 1: ground · 2: underground · 3: ground · 4: ground · 5: underground · 6: underground
- Hard mode
- no
- Enemies
- Little Goomba · Koopa Troopa · Koopa Paratroopa · Buzzy Beetle · Piranha Plant · Bullet Bill
- Items
- Super Mushroom · Starman · 1-Up Mushroom · Coin · Vine
- Printed maps
- スーパーマリオブラザーズ2 完全攻略法, booklet in ファミリーコンピュータMagazine 1986 No.11 (徳間書店, 1986) p.68-69 · ファミリーコンピュータMagazine 1986 No.10 (徳間書店, 1986) p.54-55
In the books
「土管やリフトなど、狭い足場を渡っていく地下のコース。」
"An underground level crossed on narrow footholds such as pipes and lifts." (our translation)
In the magazines
"There is a 1-Up hidden in the third Block in the upper row of Blocks."
「このつるを登れば、ワールド3へのワープゾーンが待っているぜっ!!」
"Climb this vine and the warp zone to world 3 is waiting for you!" (our translation)
「ここは、見てのとおり、ワールド4へのワープゾーン。なんとっ!! 1-2にはワープゾーンが3つもあるのだっ!!」
"As you can see, this is the warp zone to world 4. Believe it or not, 1-2 has three warp zones!" (our translation)
On the map
Map 1: ground
- page 0: Tall pipe, to Map 2, page 0
Map 2: underground
- page 1: Brick, power-up
- page 2: Brick, coins
- page 3: Hidden block, coin
- page 3: Brick, vine
- page 3: Brick, 1-up
- page 3: Brick, power-up
- page 3: Brick, 1-up
- page 3: Brick, power-up
- page 6: Brick, star
- page 8: Brick, coins
- page 1: Koopa Paratroopa (green, jumping)
- page 2: 2 Little Goombas, row 11
- page 3: Buzzy Beetle
- page 4: Lift that falls
- page 4: Lift that falls
- page 5: Lift that falls
- page 5: Lift that falls
- page 8: 3 Koopa Troopas, row 11
- page 9: Lift that falls
- page 9: Lift going up
- page 9: Lift going up
- page 10: Warp zone
- page 2: Piranha Plant
- page 3: Piranha Plant
- page 6: Piranha Plant
- page 6: Piranha Plant
- page 7: Piranha Plant
- page 7: Piranha Plant
- page 7: Piranha Plant
- page 7: Piranha Plant
- page 8: Piranha Plant
- page 11: Piranha Plant
- page 12: Piranha Plant
- page 3: Brick, vine, to Map 3, page 0
- page 10: Side pipe, to Map 4, page 1
- page 11: Pipe, to Map 4, page 1
- page 13: Warp pipe, to World 2-1
- page 14: Warp zone
Map 3: ground
Map 4: ground
Other levels that use this area: 3-2 (ROM b0:3B)
- page 2: Hidden block, coin
- page 2: Hidden block, coin
- page 1: Piranha Plant
- page 2: Flagpole
Map 5: underground
- page 0: ? block, coin
- page 0: ? block, coin
- page 0: ? block, power-up
- page 3: Hidden block, coin
- page 3: Hidden block, coin
- page 1: Lift that falls
- page 2: Lift that falls
- page 3: Koopa Troopa (red)
- page 1: Piranha Plant
- page 1: Piranha Plant
- page 2: Piranha Plant
- page 3: Piranha Plant
- page 3: Pipe, to Map 6, page 2
- page 5: Warp pipe, to World 4-1
- page 6: Warp zone
Map 6: underground
Other levels that use this area: 1-1 · 2-1 · 2-2 · 3-1 · 4-2 (ROM b0:42)
- page 3: Brick, coins
- page 3: Side pipe, to Map 2, page 8
Warp zones
| Where | To | ROM |
|---|---|---|
| Map 2, page 13 | World 2-1 | $D0DB |
| Map 3, page 3 | World 3-1 | $C29D |
| Map 5, page 5 | World 4-1 | $D114 |
Poison mushrooms, wind, and upside-down pipes
| What | Where | ROM |
|---|---|---|
| Warp zone | Map 2, page 14 | $D0DF |
| Warp zone | Map 3, page 4 | $C2A1 |
| Warp zone | Map 5, page 6 | $D11A |
Pipes and exits
| From | To | ROM |
|---|---|---|
| Map 2, page 2 | Map 3, page 0 | $C996 |
| Map 2, page 9 | Map 4, page 1 | $C9AF |
| Map 2, page 13 | Map 5, page 0 | $C9B6 |
| Map 5, page 2 | Map 6, page 2 | $C9BE |
| Map 6, page 3 | Map 2, page 8 | $C9CF |
Objects
| What | Count |
|---|---|
| Terrain change | 45 |
| Block row | 4 |
| Water hole | 1 |
| Staircase | 5 |
| Block column | 13 |
| Brick, power-up | 4 |
| Brick row | 6 |
| Pipe | 14 |
| Brick column | 29 |
| Brick, coins | 4 |
| Hidden block, coin | 7 |
| Brick, vine | 1 |
| Brick, 1-up | 2 |
| Brick, star | 1 |
| Hole | 7 |
| Side pipe | 4 |
| Scroll stop | 5 |
| Pipe, enterable | 5 |
| Warp zone | 3 |
| Platform | 7 |
| Coin row | 11 |
| Flagpole | 1 |
| Castle | 1 |
| ? block row, row 7 | 1 |
| ? block, power-up | 1 |
| Hidden block, poison mushroom | 1 |
Super Mario All-Stars
In Super Mario All-Stars (SNES, NA), this level differs from the NES data in these places. Map numbers are the ones on the map above. To see what a change does, the All-Stars objects of NES kinds were put in the NES area and drawn with the NES code. Columns count from 1 at the left of the area; rows count from the top as the NES data does, with the top row as row 0.
- Map 2: the layout ($0E:D0DD) has no water hole at column 18.
- Map 2: the layout ($0E:D0DD) adds hole at column 18.
- Map 2: drawn with the NES code, all 15 tiles that change are ones Mario passes through; the solid blocks are the same.
- Map 3: the layout ($0E:C320) has no terrain change at column 62.
- Map 3: the layout ($0E:C320) adds block column at columns 63, 64, and 65.
- Map 3: drawn with the NES code, the solid blocks differ at columns 65-80.
Source: Super Mario All-Stars area pointers $0E:C582/$0E:C5C9 and enemy pointers $0E:C4F0/$0E:C537
Sources
- Level table $C362 of the mapper 40 conversion, map built by its own code ($C2C3, enemies $8E03)
- スーパーマリオブラザーズ2 完全攻略法, booklet in ファミリーコンピュータMagazine 1986 No.11 (徳間書店, 1986) p.68-69
- ファミリーコンピュータMagazine 1986 No.10 (徳間書店, 1986) p.54-55
- Nintendo Power Volume 52 (Nintendo of America, September 1993) p.19
- BIWEEKLY ファミコン通信 No.2 (ASCII, 4 July 1986) p.34