101Leafy researched the games.
Red Switch Palace
A level in Vanilla Dome: map spot $3F, level data $11B. The timer starts at 200.
From the books
バニラドーム赤スイッチ 「赤スイッチのある宮殿。ノコノコの軍団を越えていく。」
"The palace with the red switch. You get past an army of Koopas." (our translation)
スーパーマリオブラザーズ百科 任天堂公式ガイドブック (Shogakukan, 2015) p58
From the magazines
赤スイッチの宮殿 「バニラドームのコース2で、Pスイッチを使ってブロックをコインに変えると、カギ穴に行くことができる。」
"In Vanilla Dome 2, use the P-Switch to turn the blocks into coins and you can reach the Keyhole." (our translation)
スーパーマリオワールド 完全攻略本 Vol.2 (ファミリーコンピュータMagazine 1991 No.2 supplement, Tokuma Shoten, 1991) p5
赤スイッチを押せ 「黄、緑に続く3つめのスイッチ。ついでに1UPもできてしまうぞ。」
"The third switch, after yellow and green. You can get 1UPs here too." (our translation)
スーパーマリオワールド 完全攻略本 Vol.2 (ファミリーコンピュータMagazine 1991 No.2 supplement, Tokuma Shoten, 1991) p6
うまく逃げて1UP 「Pスイッチを踏むとノコノコ(黄)が向かってくる。ジャンプでブロックに乗り、右のほうに誘導していけば、残りのノコノコを全滅させることができる。くれぐれも下には落ちないように。」
"Step on the P-switch and yellow Koopa Troopas come at you. Jump up onto the blocks and lead them to the right, and you can wipe out the rest of the Koopas. Be careful not to fall." (our translation)
スーパーマリオワールド 完全攻略本 Vol.2 (ファミリーコンピュータMagazine 1991 No.2 supplement, Tokuma Shoten, 1991) p6
赤スイッチを押してひみつのコース1へ 「ひみつのコース1に行くために赤スイッチを押すといっても過言ではない。スイッチを押せば、右の写真のようにコース1の点線ブロックが実体化するんだ。さっそく戻って、新しいコースを進もう。」
"It is no exaggeration to say you press the red switch to get through Secret Course 1. Press it and the dotted line blocks in Course 1 become solid, as in the photo at right. Go back and take the new course." (our translation)
スーパーマリオワールド 完全攻略本 Vol.2 (ファミリーコンピュータMagazine 1991 No.2 supplement, Tokuma Shoten, 1991) p6
- Name in the game
- RED SWITCH PALACE
- World
- Vanilla Dome
- Map spot (translevel)
- $3F
- Level number
- $11B
- Timer
- 200
- Normal exit
- map event $29
Map
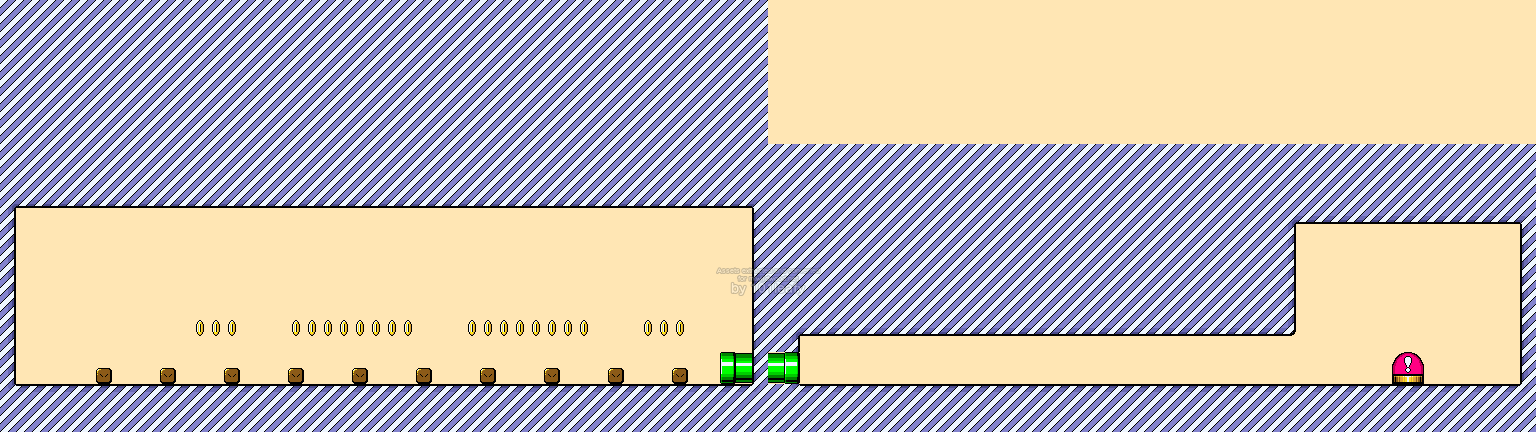
Each area was loaded with the game's own code and drawn at 1x from the blocks it left in memory. The areas reached through screen exits sit side by side, left to right. Red boxes mark enemies and items. Green boxes mark the other objects: platforms, the goal tape, switches, and the like. Dashed boxes mark the sprites not matched to a name. Blue boxes mark the pipe or door of each screen exit. An exit on a screen with no pipe or door is marked at the start of that screen. A box links to the enemy or item page, to its row on the objects page, or to where the exit leads.
Messages
- SWITCH PALACE -
The  power  of the
switch  you   have
pushed  will  turn

      into     .
Your progress will
also   be   saved.
Sprites
From the sprite data of each area (ROM $07:C450 for the first). Each id was spawned with the game's own loader and matched by eye to the enemy lists in the manuals, Mario Mania (pp50-52), and the Shogakukan guide. Ids that are not matched stay as numbers. Ids with no enemy or item page link to their row on the objects page.
| Name | Sprite id | Count | Area |
|---|---|---|---|
| P switch | $3E | 1 | $11B |
| Koopa Troopa (shell only) | $DD | 1 | $11B |
| Koopa Troopa (without a shell) | $03 | 1 | $11B |
| Koopa Troopa | $04 | 3 | $11B |
| Koopa Troopa | $05 | 3 | $11B |
| Koopa Troopa | $06 | 2 | $11B |
| $6D (not matched) | $6D | 1 | $1D8 |
Screen exits
Where each screen's exit leads. Every pipe and door on one screen goes to the same exit.
- Area $11B, screen 2: Area $1D8
- ROM names $04:A17A, event $05:D647, sprites $07:C450
Vanilla Secret 2 · Vanilla Secret 3 · Vanilla Fortress · Vanilla Ghost House · Vanilla Secret 1 · Vanilla Dome 3 · Vanilla Dome 2 · Vanilla Dome 4 · Vanilla Dome 1 · #3 Lemmy's Castle